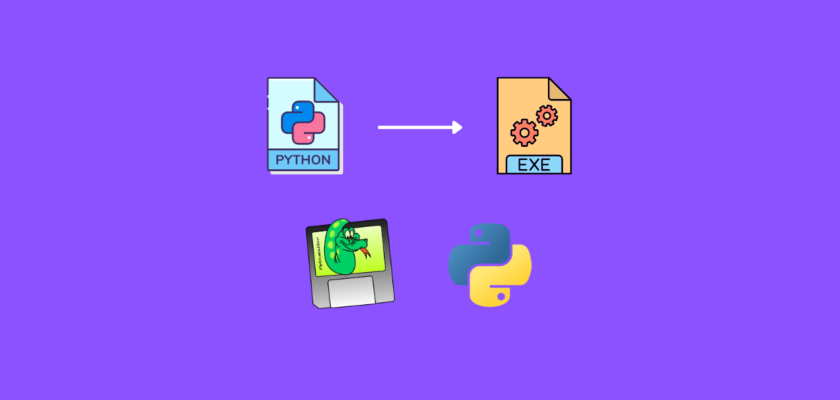
In this tutorial we will explore how to convert any Python file (.py) to executable file (.exe) on Windows operating system using PyInstaller.
[the_ad id=”3031″]Table of Contents
- Introduction
- Sample Python code
- Convert .PY file to .EXE file – Basic
- Convert .PY file to .EXE file – Advanced
- Conclusion
Introduction
For many Python users, creating visibility and reproducibility of their projects to their company or communities is essential.
However, not everyone is using Python or even has it installed. In such cases users are much rather to work with file extensions they are familiar with, for example .EXE files.
In this tutorial we will cover how to take a simple Python project and convert it into a Windows program in .EXE format that allows everyone to use it on their computer without having to install all of the dependencies.
To continue following this tutorial we will need the following Python library: pyinstaller.
PyInstaller bundles a Python application or Python code and all its dependencies into a single package with an executable file.
If you don’t have it installed, please open “Command Prompt” (on Windows) and install it using the following code:
pip install pyinstaller
Sample Python code
In order to continue in this tutorial we will need some Python code to work with.
To make this tutorial more illustrative and actually build an executable file for a Python program, we will use the code from one of the previous tutorials where we created a simple GUI calculator using Tkinter.
Here is the Python code we will use in this tutorial:
from tkinter import *


#Create a calculator class
class Calculator:
    def __init__(self, master):

        """
        Method that initializes the object's attributes
        """

        #Assign reference to the main window of the application
        self.master = master

        #Add a name to our application
        master.title("Python Calculator")

        #Create a line where we display the equation
        self.equation = Entry(master, width=36, borderwidth=5)

        #Assign a position for the equation line in the grey application window
        self.equation.grid(row=0, column=0, columnspan=4, padx=10, pady=10)

        #Execute the .creteButton() method
        self.createButton()


    def createButton(self):

        """
        Method to create a button

        INPUT: nothing
        OUTPUT: creates a button
        """

        #We first create each button one by one with the value we want
        #Using addButton() method which is described below
        b0 = self.addButton(0)
        b1 = self.addButton(1)
        b2 = self.addButton(2)
        b3 = self.addButton(3)
        b4 = self.addButton(4)
        b5 = self.addButton(5)
        b6 = self.addButton(6)
        b7 = self.addButton(7)
        b8 = self.addButton(8)
        b9 = self.addButton(9)
        b_add = self.addButton("+")
        b_sub = self.addButton("-")
        b_mult = self.addButton("*")
        b_div = self.addButton("/")
        b_clear = self.addButton("c")
        b_equal = self.addButton("=")

        #Arrange the buttons into lists which represent calculator rows
        row1 = [b7, b8, b9, b_add]
        row2 = [b4, b5, b6, b_sub]
        row3 = [b1, b2, b3, b_mult]
        row4 = [b_clear, b0, b_equal, b_div]

        #Assign each button to a particular location on the GUI
        r = 1
        for row in [row1, row2, row3, row4]:
            c = 0
            for buttn in row:
                buttn.grid(row=r, column=c, columnspan=1)
                c += 1
            r += 1


    def addButton(self, value):

        """
        Method to process the creation of a button and make it clickable

        INPUT: value of the button (1,2,3,4,5,6,7,8,9,0,+,-,*,/,c,=)
        OUTPUT: returns a designed button object
        """
        return Button(
            self.master,
            text=value,
            width=9,
            command=lambda: self.clickButton(str(value)),
        )


    def clickButton(self, value):

        """
        Method to add actions for button clicks

        INPUT: value of the button (1,2,3,4,5,6,7,8,9,0,+,-,*,/,c,=)
        OUTPUT: what action will be performed when a particular button is clicked
        """

        #Get the equation that's entered by the user
        current_equation = str(self.equation.get())

        #If user clicked "c", then clear the screen
        if value == "c":
            self.equation.delete(-1, END)

        #If user clicked "=", then compute the answer and display it
        elif value == "=":
            answer = str(eval(current_equation))
            self.equation.delete(-1, END)
            self.equation.insert(0, answer)

        #If user clicked any other button, then add it to the equation line
        else:
            self.equation.delete(0, END)
            self.equation.insert(-1, current_equation + value)


#Execution
if __name__ == "__main__":

    #Create the main window of an application
    root = Tk()

    #Tell our calculator class to use this window
    my_gui = Calculator(root)

    #Executable loop for the application, waits for user input
    root.mainloop()
Save this code in calculator.py
If you run it, a calculator GUI should start:
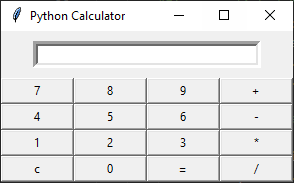
You can test the application before we convert it to .EXE file.
Convert .PY file to .EXE file – Basic
Once you have saved the Python code in calculator.py, your current working directory should look like this:
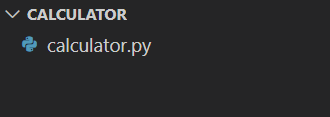
with only one file with Python code.
Next, we are going to open the terminal and navigate to this directory.
It should look like this:
C:\Users\datas\Desktop\My Projects\Calculator>or in general:
C:\your-path-to-folder>Now we can create the .EXE executable file from the Python calculator.py file:
pyinstaller calculator.py
This is the basic way of creating the executable file without any additional options specified (which we will cover in the advanced section).
It will take some time to create all files and folders, and as a result, the current working directory should look like this:
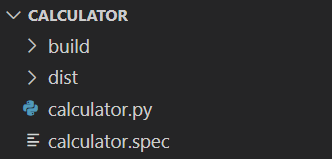
Looks like a lot of files have been created in each folder, and the .EXE file we are looking for is located in the dist/calculator folder and is generated with the same name as the Python file: calculator.exe
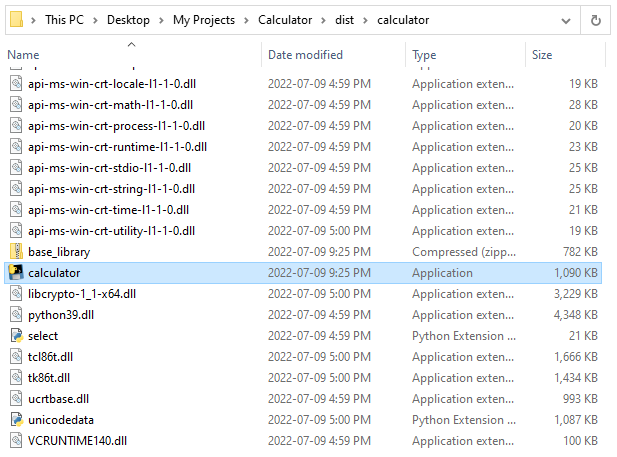
By default, the code creates a one-folder bundle containing an executable file.
You can double click on the calculator file, and the calculator GUI will open.
Note: a console window will open as well for standard i/o. If you want a standalone calculator running, follow the instructions in the advanced section.
Convert .PY file to .EXE file – Advanced
In this section we will add a few specific options when converting the Python file to executable file that will make the directory look simpler as well as remove the console window.
Let’s go back to the original structure of the working directory:
Recall from the previous sections how many different files were generated inside the dist/calculator folder.
It happens because by default, the code creates a one-folder bundle containing an executable file. However, the library has an option that allows to create a one-file bundled executable: –onefile
In addition, we will remove the console window with another option: –noconsole
We will add these options when running the PyInstaller process:
pyinstaller --onefile --noconsole calculator.py
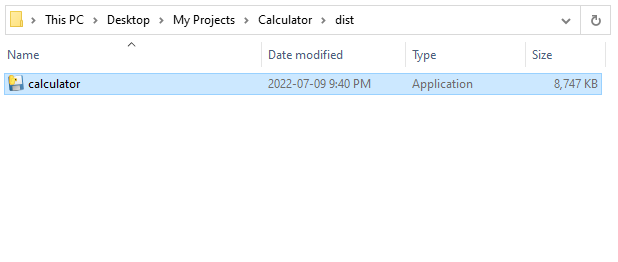
It will take some time to create all files and folders, and as a result, the current working directory should look like this (same as before):
However, now in the dist folder there is only 1 executable file:
You can double click on the calculator file, and the calculator GUI will open.
Notice that now it is only the standalone calculator app that opens (without the console window).
Conclusion
In this article we explored how to convert any Python file (.py) to executable file (.exe) on Windows operating system using PyInstaller.
Feel free to leave comments below if you have any questions or have suggestions for some edits and check out more of my Python Programming tutorials.