In this tutorial we will discuss how to work with NoSQL database MongoDB using Python and specifically PyMongo.
Table of Contents
- Introduction
- Create a MongoDB account and cluster
- Create a MongoDB database
- Create a connection to MongoDB database for Python application
- Connect to MongoDB database using Python
- Get documents from MongoDB using Python
- Update documents in MongoDB using Python
- Insert documents into MongoDB using Python
- Conclusion
Introduction
MongoDB is one of the most popular NoSQL databases in the field. Unlike standard relational databases that use SQL, MongoDB has a non-relational model that stores the data as documents using JSON-like structure.
MongoDB has various benefits including high scalability, allowing to store any kind of data, high flexibility, and storing multiple layers of information without having to do a lot of workarounds on schemas and database design.
MongoDB allows for multiple ways of connecting to the database. Since we are primarily working with Python in our tutorials, we will utilize PyMongo library. So what is PyMongo? PyMongo is a Python distribution containing tools to work with MongoDB from Python.
To continue following through the technical part of this tutorial, we will need pymongo and pprint libraries installed.
If you don’t have it installed, please open “Command Prompt” (on Windows) and install it using the following code:
pip install pymongo
pip install pprint
Create a MongoDB account and cluster
To get started, we will need to create a MongoDB account and configure our first cluster. It is very simple and MongoDB website is one of the most user friendly platforms for setting up the initial workspace.
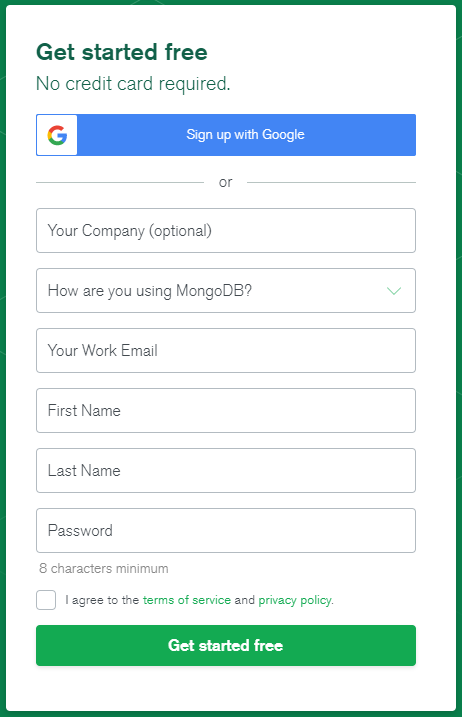
Follow through to MongoDB account creation page and complete the easy signup. You will have the option to register by filling out the information or by simply signing up with Google:
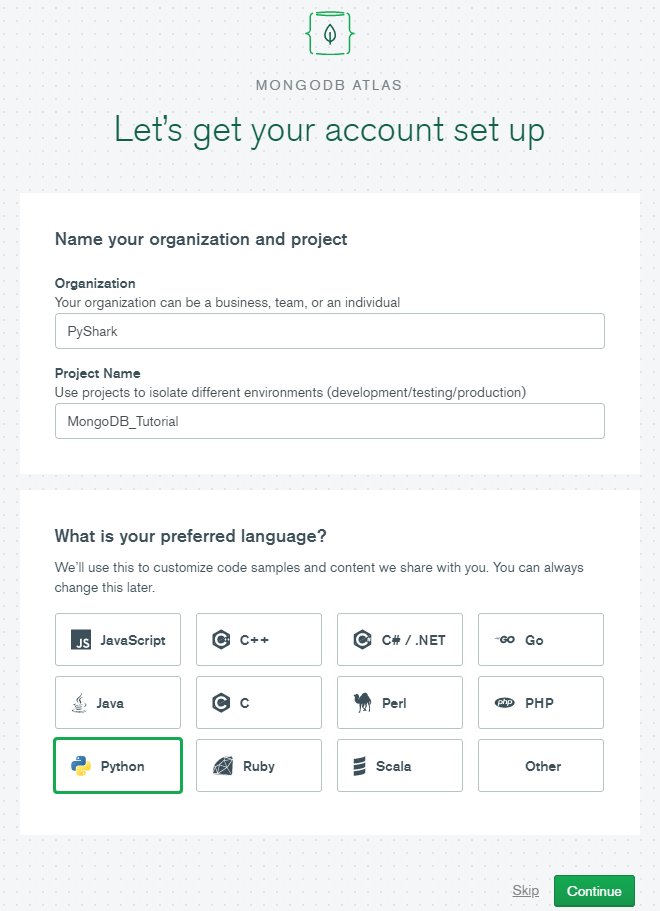
The next step after the signup would be to fill out some information about your organization, the project, and select the preferred programming language. I filled out mine as follows:
And in the next page you are given the option to select the tier for your account. We can simply continue in “Shared Clusters” and click on “Create a cluster“.
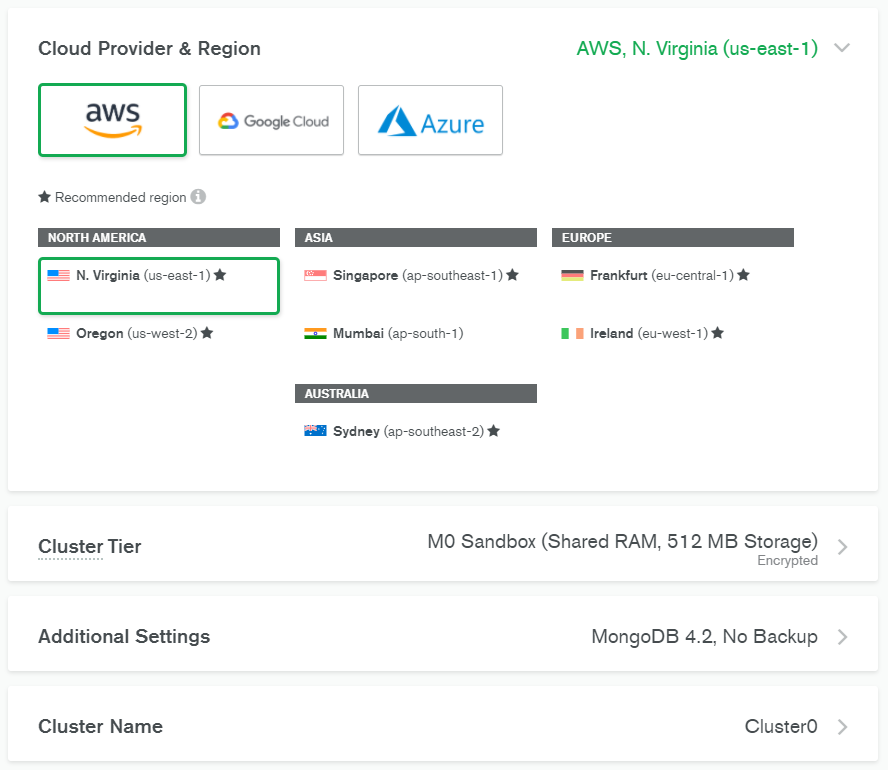
On the next page you will be given options for the cloud provider and region, as well as cluster tier, some settings, and the cluster name. We can leave all of them at default values:
And click “Create Cluster“.
After, you will be redirected to the main page of your project and it will take a few minutes to create a cluster.
Once everything is set up, your screen should show the following:

Create a MongoDB database
The cluster we just created is empty. Let’s create a test database and leverage it later in the tutorial.
From the cluster page, click on the “Collections” bubble right under the green dot with the cluster name. It should take you here:
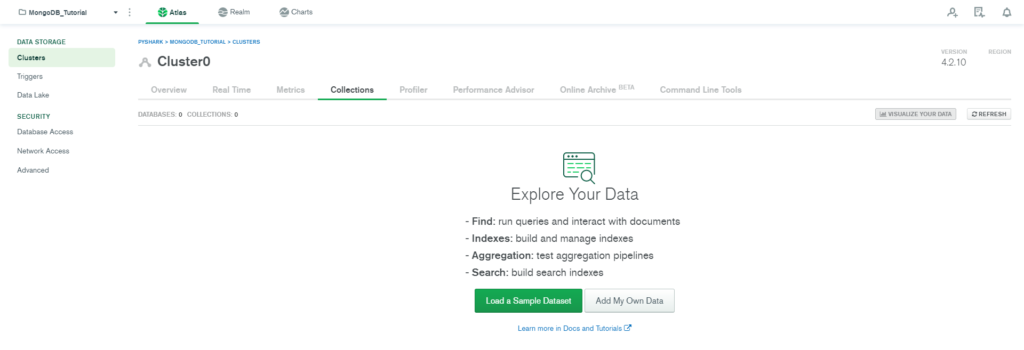
As we can see we have no data in our cluster just yet.
Here you have two options, you can either load some sample data, or create your own.
For this tutorial let’s load a sample dataset. Just click on “Load a Sample Dataset” and continue. It will take a few minutes before it loads. Then you can refresh the page and you will see some databases appearing on the cluster.
The very first database that will be at the top of your cluster is “sample_airbnb” and inside that database, there will be a collection named “listingsAndReviews“.
Click into the collection and take a look at a few sample documents stored. These are records that have information about some Airbnb properties, like this:
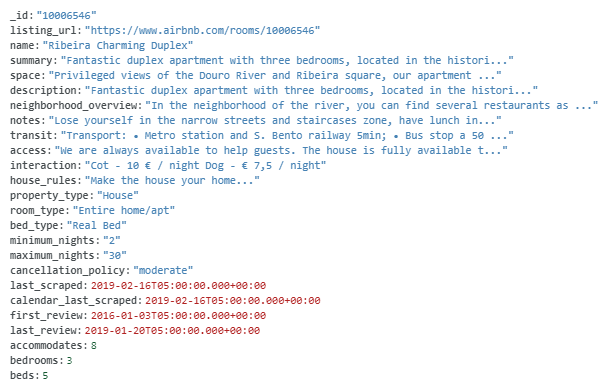
Note: the way MongoDB works is that it stores data records as documents, which are grouped together and stored in collections. And a database can have multiple collections.
At this point we have created a MongoDB cluster and added some sample data to it. The next step is to connect to the MongoDB database using Python.
Create a connection to MongoDB database for Python application
Now that our cluster is created, we want to establish a connection to it and work with the data.
Let’s go back to our main cluster page:
and click on “Connect“:
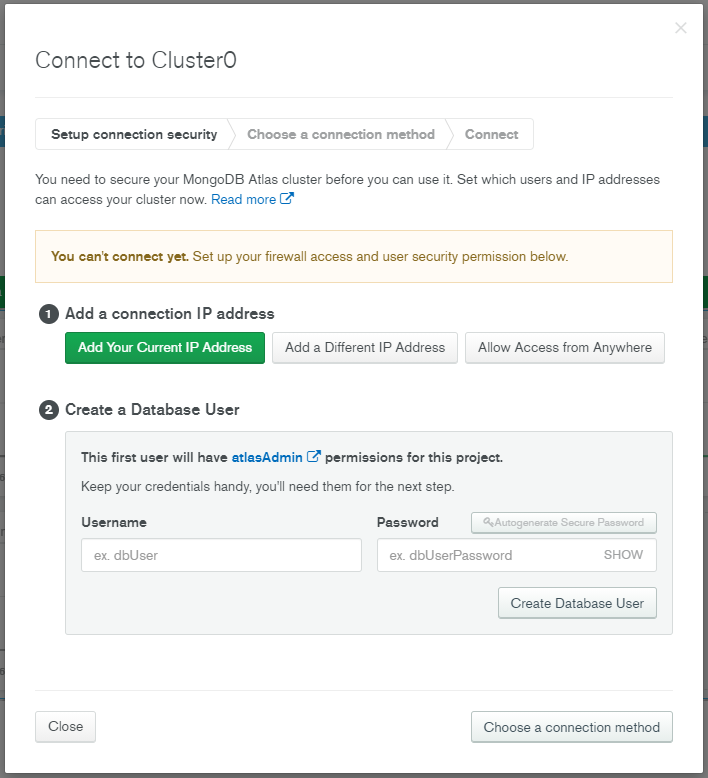
One step before we can connect to our database is creating user security permissions, which includes: adding your IP address and creating a database user.
- First, simply click on “Add Your Current IP Address” and a tab will show up with your IP address, and click “Add IP Address“.
- Then, fill out the information for your database user (I chose my username as user and password as test) and click “Create Database User“.
- After filling out all of this information, you will notice how the “Choose a connection method” button at the bottom right corner turns green. We are okay to proceed, go ahead and click on it.
The next menu will ask what type of connection method we will be using:
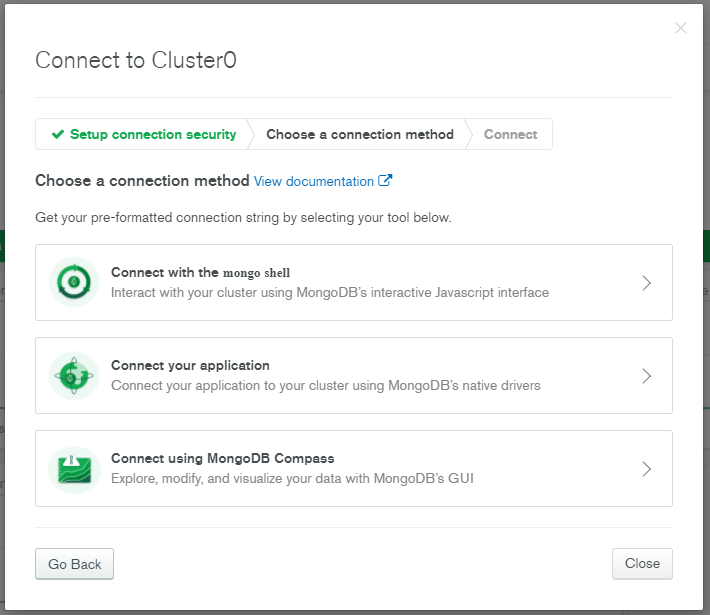
Since we will be working in Python and using PyMongo, we choose “Connect your application“:
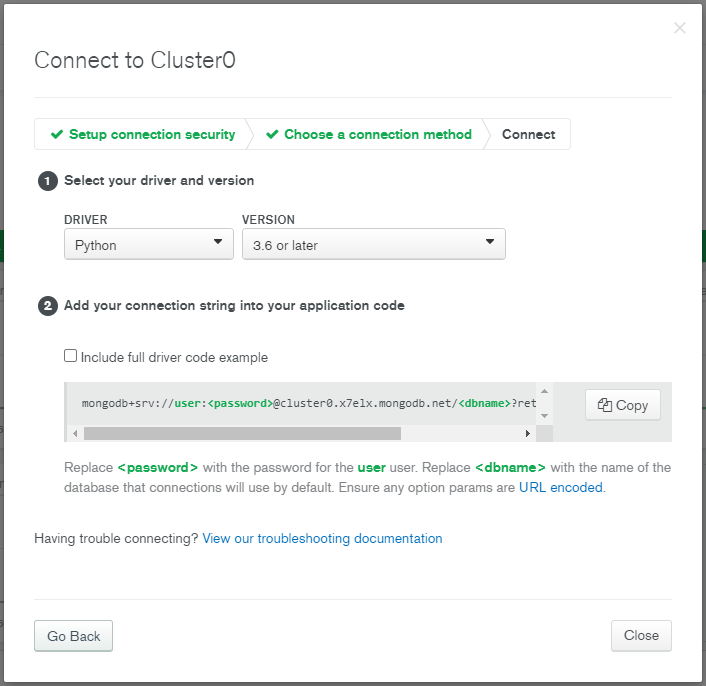
In this tab, we choose Python as the “DRIVER“, and the Python version you have installed as the “VERSION”.
Now the connection string will be created, and we will need to copy it. Mine looks like this:
mongodb+srv://user:<password>@cluster0.x7elx.mongodb.net/<dbname>?retryWrites=true&w=majorityPerfect. So the connection string is ready and we finished everything we needed to do from the web browser side. The rest of the tutorial will be in an IDE.
Connect to MongoDB database using Python
At this point we will start utilizing Python to access the MongoDB database.
First, let’s establish a connection to our cluster:
import pymongo
from pprint import pprint

user='user'
password='test'

myconnection='mongodb+srv://'+user+':'+password+'@cluster0.x7elx.mongodb.net/?retryWrites=true&w=majority'

myclient = pymongo.MongoClient(myconnection)
Notice that I rearranged the connection string from the previous section by passing user and password as strings which I defined before.
If the code didn’t give any errors, then we are connected. We can also double check this by printing out a list of databases stored in our cluster:
print(myclient.list_database_names())
And with the test data we get:
['sample_airbnb', 'sample_analytics', 'sample_geospatial', 'sample_mflix', 'sample_restaurants', 'sample_supplies', 'sample_training', 'sample_weatherdata', 'admin', 'local']To continue with the next parts of this tutorial we will need to connect to the database, and then to a collection inside of that database.
Recall from before that the database we want to work with is ‘sample_airbnb’ and the collection we want to work with is ‘listingsAndReviews’.
So we go ahead and define those in Python:
mydb = myclient['sample_airbnb']

mycol = mydb['listingsAndReviews']
Get documents from MongoDB using Python
This section will mainly focus on how to retrieve data from MongoDB using Python and various types of querying the data.
There are multiple entries in the ‘listingsAndReviews’ collection, and as a working sample we will use this one:
Retrieve a single document from MongoDB
This is one of the most basic query types and simply retrieves one document matching the query parameters given.
This can be done by using the .find_one() method:
mydoc = mycol.find_one()
pprint(mydoc)
Preview of sample output:
{'_id': '10006546',
 'accommodates': 8,
 'address': {'country': 'Portugal',
             'country_code': 'PT',
             'government_area': 'Cedofeita, Ildefonso, Sé, Miragaia, Nicolau, Vitória',
             'location': {'coordinates': [-8.61308, 41.1413],
                          'is_location_exact': False,
                          'type': 'Point'},
             'market': 'Porto',
             'street': 'Porto, Porto, Portugal',
             'suburb': ''},
 'amenities': ['TV',
               'Cable TV',
               'Wifi',
               'Kitchen',
               'Paid parking off premises',
               'Smoking allowed',
               'Pets allowed',
               'Buzzer/wireless intercom',
               'Heating',
               'Family/kid friendly',
               'Washer',
               'First aid kit',
               'Fire extinguisher',
               'Essentials',
               'Hangers',
               'Hair dryer',
               'Iron',
               'Pack ’n Play/travel crib',
               'Room-darkening shades',
               'Hot water',
               'Bed linens',
               'Extra pillows and blankets',
               'Microwave',
               'Coffee maker',
               'Refrigerator',
               'Dishwasher',
               'Dishes and silverware',
               'Cooking basics',
               'Oven',
               'Stove',
               'Cleaning before checkout',
               'Waterfront'],
 'availability': {'availability_30': 28,
                  'availability_365': 239,
                  'availability_60': 47,
                  'availability_90': 74},
 'bathrooms': Decimal128('1.0'),
 'bed_type': 'Real Bed',
 'bedrooms': 3,
 'beds': 5}
You will notice that even without any given parameters this code will work and what it will do is find the first document in a collection and retrieve it (I’m not adding the output since it’s a very long document).
Now, what if we want a specific document, not the first one? We should provide some search parameters to this method, and the information will be retrieved. For example, we want to find a listing with ID = ‘10009999’.
The search parameters should be added to the .find_one() method in a dictionary format (key-value pairs):
mydoc = mycol.find_one({"_id": "10009999"})
pprint(mydoc)
The output from this query will print out a different document.
Preview of sample output:
{'_id': '10009999',
 'access': '',
 'accommodates': 4,
 'address': {'country': 'Brazil',
             'country_code': 'BR',
             'government_area': 'Jardim Botânico',
             'location': {'coordinates': [-43.23074991429229,
                                          -22.966253551739655],
                          'is_location_exact': True,
                          'type': 'Point'},
             'market': 'Rio De Janeiro',
             'street': 'Rio de Janeiro, Rio de Janeiro, Brazil',
             'suburb': 'Jardim Botânico'},
 'amenities': ['Wifi',
               'Wheelchair accessible',
               'Kitchen',
               'Free parking on premises',
               'Smoking allowed',
               'Hot tub',
               'Buzzer/wireless intercom',
               'Family/kid friendly',
               'Washer',
               'First aid kit',
               'Essentials',
               'Hangers',
               'Hair dryer',
               'Iron',
               'Laptop friendly workspace'],
 'availability': {'availability_30': 0,
                  'availability_365': 0,
                  'availability_60': 0,
                  'availability_90': 0},
 'bathrooms': Decimal128('1.0'),
 'bed_type': 'Real Bed',
 'bedrooms': 1,
 'beds': 2}
Using the above code you are able to query a single record by any of the key-value pairs that exist in the document. As an example, you may want to pull a single record where the property accommodates 5 people:
mydoc = mycol.find_one({"accommodates": 5})
pprint(mydoc)
And the output you will see will be a different property.
Retrieve multiple documents from MongoDB
You may most likely find a situation when you want to access more than one document that satisfies your search criteria.
Here we will use the .find() method since we are trying to retrieve more than one document. It is important to note that the output will be an object containing multiple properties, and to print each of them we would need to loop through it.
For example, you may be looking for a list of properties that:
- accommodate 5 people
- have 3 bedrooms
- type of property is a house
houses = mycol.find({"accommodates": 5, 'beds': 3, "property_type" : "House"})

for house in houses:
    pprint(house)
You should see the printout of quite a significant number of properties matching your criteria.
Update documents in MongoDB using Python
This section will mainly focus on how to update records in MongoDB.
You can update any record or document that is stored in MongoDB using .update_one() from the PyMongo library.
It requires two parameters: .update_one(filter, update):
- filter: a query that helps us identify a particular record to update
- update: a query that contains the change to be applied
For example, let’s use the same record as in the previous section (ID = ‘10009999’). If you print out its content you will see that this property accommodates 4 people (‘accommodates’: 4).
Now, we would like to change this data to show that this property can accommodate 6 people. Let’s see how to do it:
mycol.update_one({"_id": "10009999"}, {"$set": {"accommodates": 6}})
Note above, that the ‘update’ part of the query has a specific format with “$set” operator, as it is required to pass into MongoDB to show that we are updating the current record.
To see that the changes took place, simply retrieve this record and print it out:
mydoc = mycol.find_one({"_id": "10009999"})
pprint(mydoc)
Of course there is much more to the updating method, and it can be much more complicated with more parameters. Here we look at the basic examples to help you understand the flow and the process.
Insert documents into MongoDB using Python
So far we learnt how to retrieve records (or documents) and how to update them. A natural question you would have is how do I add new entries to MongoDB?
Let’s say we would like to add a new property to our AirBnB directory. This listing has the following information: it accommodates 2 people, has 1 bedroom with 2 beds.
Recall that data in MongoDB is stored in JSON-style documents, so our first step would be to create a Python dictionary to represent our entry:
newdoc={
    "accommodates": 2,
    "bedrooms": 1,
    "beds": 2
}
Note that each document in MongoDB has a unique “_id” key. It’s a special key that will be automatically added unless specified. It must be unique across the collection.
It is not necessary to add it as it will be autogenerated, but for us to visualize the results it will be easier to retrieve the record if we already know its ID. So let’s add some ID to our new document (I chose a large number just to make sure it’s unique and wasn’t used by other records):
newdoc={
    "_id": "9999999",
    "accommodates": 2,
    "bedrooms": 1,
    "beds": 2
}
To add this document to MongoDB using PyMongo library, we will need to use .insert_one() method and simply pass the new defined document as an argument to it:
mycol.insert_one(newdoc)
Great! The new document has been added to our collection. Let’s take a look at it:
mydoc = mycol.find_one({"_id": "9999999"})
pprint(mydoc)
And we see exactly what we added:
{'_id': '9999999', 'accommodates': 2, 'bedrooms': 1, 'beds': 2}Conclusion
In this tutorial we explored how to work MongoDB using Python and specifically PyMongo library.
The examples shown are a good starting point for anyone looking to learn more about MongoDB and gain in depth knowledge on the subject.
I also encourage you to check out my other posts on Python Programming.
Feel free to leave comments below if you have any questions or have suggestions for some edits.